(Chemistry Projects) Class 12th Chemistry Projects for 2009 Exams (Charles's Law: Volume vs. Temp. of a Gas at Const. Pressure)
Disclaimer: This website is NOT associated with CBSE, for official website of CBSE visit - www.cbse.gov.in
Class 12th Chemistry Projects for 2009 Exams
Charles's Law: Volume vs. Temperature of a Gas at Constant Pressure
Objective
The goal of this project is to measure the relationship between the volume of a gas and its temperature, when the pressure of the gas is held constant.
Introduction
This is a modern version of a classic experiment by Jacques Charles (who was also interested in flying balloons). Charles studied the volume of a sample of air—sealed in a glass tube with a U-shaped curve—as he systematically changed the temperature by immersing the tube in a water bath. The air was trapped by a column of mercury, added to the open end of the tube. By changing the amount of mercury in the tube, Charles could maintain a constant pressure on the trapped air as the temperature was changed. Charles's apparatus was an example of a manometer, a device used to measure pressure.
You can learn more about how manometers work, and even run a simulated Charles's Law experiment by visiting the Chemistry Applet website (see Bibliography). This would be excellent preparation for doing the experiment on your own, so we highly recommend it. Note: to calculate the volume of gas in the applets, you will need to know that the inside diameter of the applet's manometer tube is 4.286 cm.
You can repeat Charles's experiments for yourself with an inexpensive, modern apparatus based on a disposable plastic syringe and a water bath. (Mercury is a dangerous neurotoxin, so we'll avoid working with it.)
Terms, Concepts and Questions to Start Background Research
To do this project, you should do research that enables you to understand the following terms and concepts:
-
pressure,
-
volume,
-
Charles's Law,
-
ideal gas,
-
atmospheric pressure,
-
manometer,
-
kelvins,
-
absolute zero.
Questions
-
What assumption is made about the pressure of the gas in this experiment?
-
What is the relationship between the degrees Celsius and kelvins?
Bibliography
-
Here are the Chemistry Applet webpages mentioned in the Introduction. These will really help your understanding of Charles's Law if you take the time to do the virtual experiments! To calculate the volume of gas in the applets, you will need to know that the inside diameter of the applet's manometer tube is 4.286 cm.
-
Blauch, D., 2004. "Gas Laws: Pressure", Department of Chemistry, Davidson College. [accessed January 23, 2006] http://www.chm.davidson.edu/ChemistryApplets/GasLaws/Pressure.html,
-
Blauch, D., 2004. "Gas Laws: Charles's Law", Department of Chemistry, Davidson College. [accessed January 23, 2006] http://www.chm.davidson.edu/ChemistryApplets/GasLaws/CharlesLaw.html.
-
-
The Sizes.com website has an exhaustive index of units of measure, including both degrees Celsius and kelvins:
-
Editor, Sizes.com, 2000. "centigrade and Celsius temperature scales" [accessed January 23, 2006] http://www.sizes.com/units/temperature_centigrade.htm
-
Editor, Sizes.com, 2000. "kelvin" [accessed January 23, 2006] http://www.sizes.com/units/temperature_kelvin.htm
-
Materials and Equipment
To do this experiment you will need the following materials and equipment:
-
35 ml syringe (available, for example, from Science First ("Gas Law Demonstrator Kit", Science First, Buffalo, NY. http://www.sciencefirst.com/vw_prdct_mdl.asp?prdct_mdl_cd=30170),
-
a homemade clamp to hold syringe underwater, which can be made with:
-
two sturdy chopsticks (or two sturdy wood dowels) longer than the diameter of your cooking pot,
-
two rubber bands,
-
a weight (e.g., a can of soup);
-
-
small piece of wire,
-
thermometer (calibrated in °C, range at least 0–100°C),
-
water,
-
ice,
-
cooking pot, deeper than syringe is tall,
-
stove.
Experimental Procedure
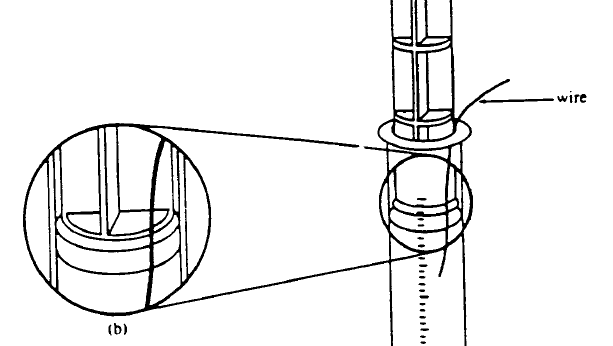
Experimental Apparatus
|
|
|
Diagram showing how to set up syringe. The thin wire between the plunger tip and the inner syringe wall allows air to escape from in front of the plunger in order to equalize pressure. It is removed before starting the experiment. Diagram adapted from Gabel, 1996. |
-
Before starting the experiment, do your background research so that you are knowledgeable about the terms, concepts and questions, above.
-
With the plunger removed from the syringe, seal the tip of the syringe with a tight-fitting cap. If a suitable cap is not available, you can try epoxy or silicone sealant. Allow the epoxy or silicone the recommended curing time before proceeding with the experiment. (Note: if you seal the tip with the plunger in place, you will probably not be able to remove the plunger unless you destroy the seal. Why?)
-
When your sealed syringe is ready for use, insert the plunger to the 20 ml mark of the syringe along with a thin wire as shown in the diagram above. The wire will allow air to escape from beneath the plunger, equalizing the pressure in the syringe with the atmosphere. Use the lower ring of the plunger as your indicator.
-
Hold the plunger in place and carefully withdraw the wire.
-
Make sure that the plunger can move freely in the syringe, and that the tip of the syringe is well-sealed. Give the plunger a small downward push, and verify that it springs back. If it does not, you may need to lubricate the side of the plunger with a small amount of silicone lubricant or you may not have sealed the tip of your syringe properly.
-
When you are satisfied with the results of the previous step, record the initial volume of air in the syringe and the ambient temperature.
-
You will be immersing the syringe into a water bath, and observing the changes in volume of the gas as you change the temperature of the water. Since the air in the syringe will make it buoyant, you need a way to hold the syringe under the water. If you have a ringstand and clamp, you're all set. Otherwise, you can put together a homemade clamp with materials you'll probably have around the house. Here's how:
-
Wrap a rubber band around the top of the syringe tube, just below the finger flanges.
-
Insert the chopsticks (as noted in Materials & Equipment, wood dowels can be substituted for chopsticks) through loops of this rubber band, one on either side of the syringe. Slide the syringe so that it is about 7–8 cm (3 in) in from the ends of the chopsticks.
-
Wrap the second rubber band around the short ends of the chopsticks. This will make a "V" shape, with the syringe held tightly down near the point.
-
This second rubber band can also be used to hold the thermometer upright in the water. Keep the bulb immersed in the water, but not touching the side or bottom of the pot.
-
Place this assembly on the top of your cooking pot, so that the chopsticks are supported by the rim of the pot and the syringe sticks down into the pot.
-
To hold the syringe in place when the pot is filled with water, place your weight (e.g., a can of soup) on top of the wide end of the "V" made by the chopsticks.
-
Make any necessary adjustments to make the syringe and thermometer stable, and make sure that you can read the scale on the syringe.
-
Making the Measurements and Presenting Your Results
-
Remove the syringe and thermometer assembly from the pot and set them aside.
-
Place the pot on the stove, but don't turn on the burner yet. Fill the pot with ice cubes and enough water to immerse the syringe to somewhere between the 30 and 35 ml marks.
-
Replace the syringe and thermometer assembly, and weight it down securely.
-
Allow several minutes temperature in the water bath to stabilize and for the temperature of the air in the syringe to equilibrate with the water bath. Gentle stirring may help, but be careful not to break the thermometer or knock your weight off your clamp.
-
Record the temperature of the water bath and the volume of the air in the syringe. You may want to tap the plunger lightly to make sure it is free to move. (If necessary, carefully (and briefly) lift the syringe out of the water to read the volume. You may want to have an adult help you with this part.)
-
Turn the burner on (no higher than medium heat) to gradually heat the water. At regular intervals (e.g., every 10°C), turn the heat off and allow the temperature to stabilize. Again, record the temperature of the water bath and the volume of air in the syringe.
-
Repeat the previous step up to 80 or 90°C. The pot will be quite full, so it is best to avoid boiling the water.
-
As with any experiment, it is a good idea to repeat your measurements to be sure that your results are consistent. We suggest at least three separate trials. (Note that the temperatures used do not need to be exactly the same from trial to trial!)
-
Make a graph of gas volume vs. temperature for all of your data points. It's a good idea to use a different symbol for each of your trials (if something was wrong with one particular trial, it may help you understand what went wrong).
Questions
-
What is the relationship between volume and temperature in your data set?
-
Can you extrapolate from your data to find the temperature that corresponds to a gas volume of zero? How confident are you with this result, and why?
-
Would your data look different if you used kelvins for the temperature axis instead of degrees Celsius?
-
Was the assumption of constant pressure valid?
-
What are the possible sources of error in your experiment?